When you look at a finished painting — whether it’s a striking exhibition piece or a custom commission created just for you — what you see is the final, polished result. You notice the colours, the fine details, the character of the subject, and the emotion captured on the surface. You might admire how lifelike it looks, how carefully every element is placed, or how it feels like the animal or scene is almost alive right there in front of you. It’s very easy to look at a painting and think that the work is mostly about the time spent actually putting paint to the canvas or wooden board. You might imagine that I spend a few hours or days painting, and then it’s done and ready to go. But what you don’t see, and what I want to share with you today, is everything that happens behind the scenes — the parts of the process that happen long before the first brushstroke touches the surface, and long after the last layer of paint has dried. The truth is: painting itself is only one small part of a much longer, more detailed, and incredibly careful journey. From the moment an idea or request comes in, right through to the moment the finished piece is packed and ready to be sent, there are dozens of steps, decisions, and hours of work involved. It is truly so much more than just painting.
It all begins way before I even pick up a brush, with the planning stage — and this is where the foundation of every single piece is built. This part of the process is absolutely critical to how the final piece turns out, and it takes time, careful thought, and a lot of attention to detail. My specialism and passion lie in creating beautiful, detailed pet portraits and animal artworks, and while these are rooted in capturing the true character and likeness of your beloved pets or favourite animals, planning is still a big part of the work.
Even when working from reference photos you provide, those images don’t always show every single detail I need to create a complete, balanced, and stunning composition. Sometimes photos are taken from awkward angles, are slightly blurry, are cropped so part of the animal is missing, or are taken in lighting that hides important features or colours. Sometimes you might have one great photo of your pet’s face, and another of their body, but none that show them in the exact pose or setting you’d love to see in the painting. That means I have to step in as both an artist and a designer. I carefully study every reference image you share, work out how to bring everything together naturally, and plan out the composition so that it flows perfectly, looks realistic, and captures your pet exactly as you know and love them.
Often, I need to add details that aren’t clearly visible or present in the original photos at all — things like the texture of fur, the exact shade of an eye, small markings or patterns, a suitable background that complements the animal, or subtle elements that bring out their personality. Every single addition or adjustment I make is carefully considered to make sure it fits perfectly, feels authentic, and honours exactly what you want the painting to be. This stage can take hours, sometimes even days — just to sketch out the design, adjust the composition, check colours and proportions, and make sure every element is in place and approved before any paint touches the surface. It’s about building the story visually, so that when the painting begins, I know exactly where I am going and that the foundation is solid.
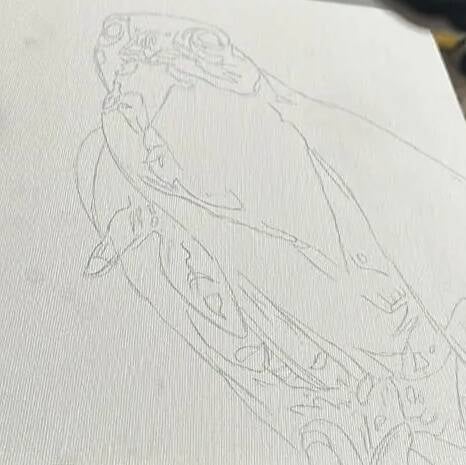
First Sketch (Original Design-Lanner Falcon)
Once the planning and initial sketches are agreed upon, the painting stage itself begins — but even this part isn’t just about creating the artwork. Alongside painting, I am constantly managing content and communication, because transparency and keeping my clients involved every step of the way is such an important part of how I work. I have to think about cameras, lighting, angles, and capturing every single step of the process as I go. Every single day, without fail, I take clear, high-quality photos and sometimes short videos of the work in progress. These aren’t just for my own records or for sharing on social media later — they are first and foremost for you, my client. I send daily updates, so you can follow along with how your piece is developing, see the details appearing layer by layer, and watch it come to life right in front of your eyes.
This serves two really important purposes. First, it means you never have to wonder how your commission is going or what it looks like at any stage — you are always part of the process. Second, and most importantly, it means we can catch anything early. If you’d like a small change, if something doesn’t look quite how you imagined it, or if you want to adjust a detail like colour, expression, or background, we can do it straight away, while the paint is still fresh and before I move on to the next layer or stage. This ensures that by the time the painting is finished, it is exactly what you wanted, and there are no surprises. Capturing this content also means I have a full, detailed record of the journey — from the first outline to the final highlights — which I can later download, sort, edit, and organise to preserve the story of your piece and show exactly how much care and attention goes into every part of the work.
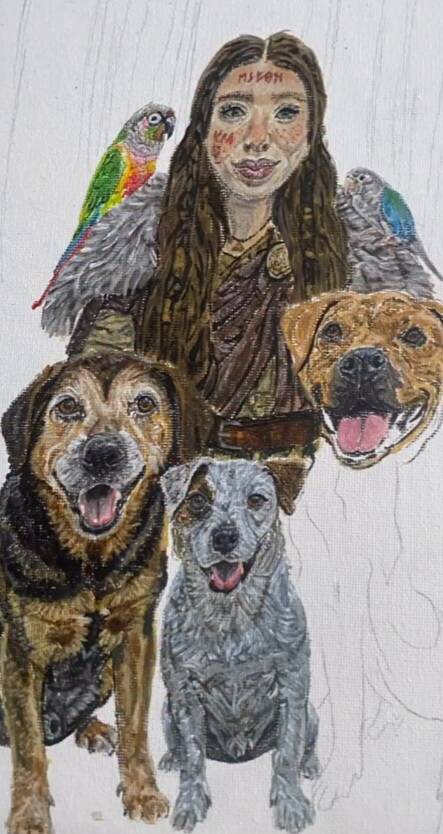
Client update example from my latest comission
When the last stroke of paint is done and the artwork is complete, you might think the hard work is finished — but actually, a whole new set of steps begins, and these are just as important as the painting itself. First, I have to go through all the content I’ve captured over the days or weeks of painting. This means downloading hundreds of photos and videos, sorting through them to find the best shots, editing them carefully to make sure they show the true colours, textures, and details of the work (without altering or changing the actual painting), and saving and backing everything up properly so nothing is ever lost. This alone takes quite a bit of time and focus, but it’s worth it to preserve the journey of every piece.
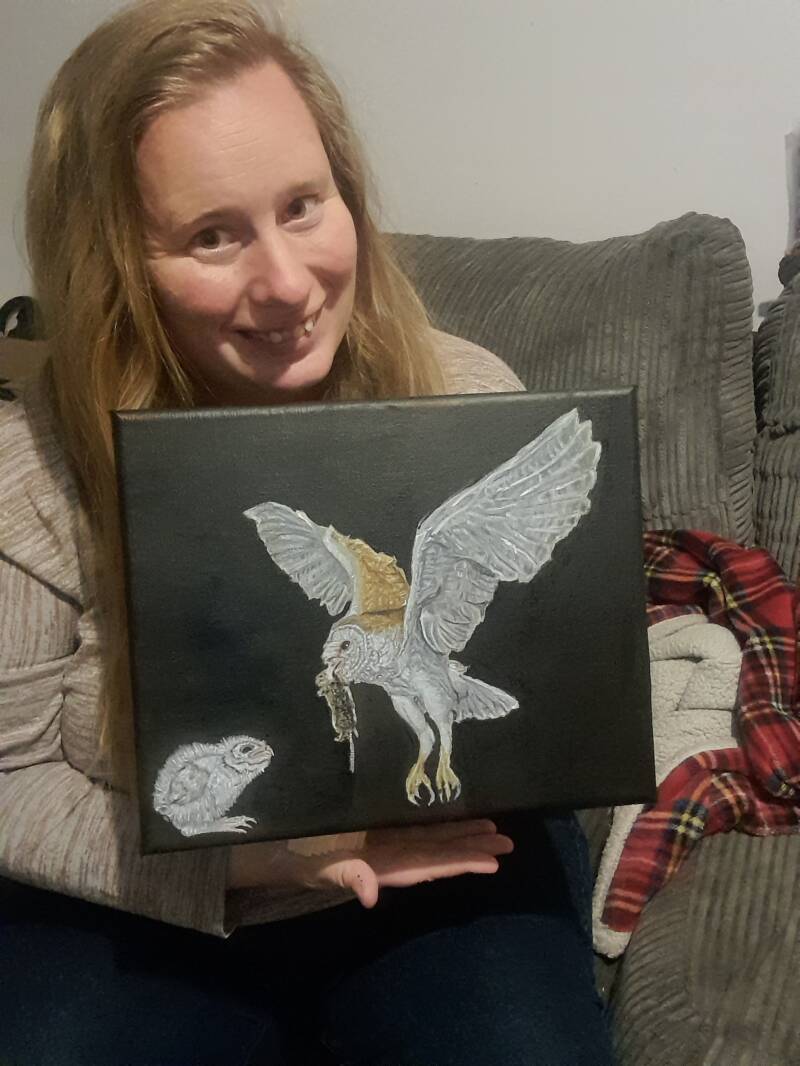
Painting side of things finished- original design "Silent Wings, Loving Heart"
Next comes the finishing process, and this is where precision, knowledge of materials, and experience are absolutely vital. Varnishing is not just about making the painting look shiny or finished — it is about protecting the artwork for years, even generations, to come. It creates a barrier against dust, moisture, sunlight, and handling, ensuring that the colours stay bright and true and that the paint surface stays safe and intact for a lifetime. However, how I prepare and apply the finish depends entirely on the surface I have worked on, and I have to be very careful to get this right, or the whole piece could be ruined.
For pieces painted on wooden panels or wooden products, the process is more involved and requires extra preparation. Wood is naturally absorbent, and if I were to apply varnish directly onto the paint and the raw wood itself, it would soak in unevenly, cause discolouration, create patchy or dull areas, or even damage the paint layers underneath. To prevent this, I have to first apply a layer of PVA glue. This acts as a high-quality sealant — it soaks slightly into the wood, dries to form a smooth, non-absorbent barrier, and ensures that when I apply the varnish later, it sits perfectly on top, goes on smoothly and evenly, and protects both the paint and the material underneath. I have to let this sealant dry fully and completely before I can even think about adding the varnish, and I check it carefully multiple times to make sure the surface is perfectly sealed, smooth, and ready.
For paintings created on canvas, the challenge is different but just as important. I never, ever rely on indoor house lights or room lighting when I am varnishing. Standard bulbs, lamps, or ceiling lights can cast strong shadows, create bright glares, or change how colours and surfaces look to my eye. They can make it seem like every part of the surface is fully covered and finished — when in fact, there might be small areas, tiny gaps, or thin spots I have missed. If I don’t spot these, the painting won’t be protected evenly, and I will have to go back and revarnish the whole thing later, which adds even more time and work. Instead, I always work in clear, natural daylight — usually near a large window where the light is bright and even. This gives me the truest possible view of the painting, highlights every single area, texture, and corner clearly, and ensures that the varnish is applied smoothly, evenly, and thoroughly over every inch of the surface, leaving no part unprotected.
Once the varnish is carefully and evenly applied, the waiting game begins — and patience is absolutely essential here. It is not enough just to let the painting feel dry to the touch. Varnish needs time not just to dry on the surface, but to fully set and cure deep down. This is the chemical process where the finish hardens completely, bonds properly with the paint layer, and becomes durable, tough, and long-lasting enough to protect the artwork for years. This curing process can take several days, and sometimes even longer, depending entirely on the environment and weather conditions. My workspace is my kitchen area, and because there are no radiators or heating in this room, the temperature can be quite cool — especially during the autumn, winter, and colder months of the year. In colder weather, drying and curing times slow down significantly, as the finish needs warm, dry air to harden properly. I always factor in extra waiting time to make sure everything is fully hardened, stable, and safe before I move on — rushing this stage would risk smudging the finish, leaving marks, damaging the surface, or ruining all the hard work that came before it.
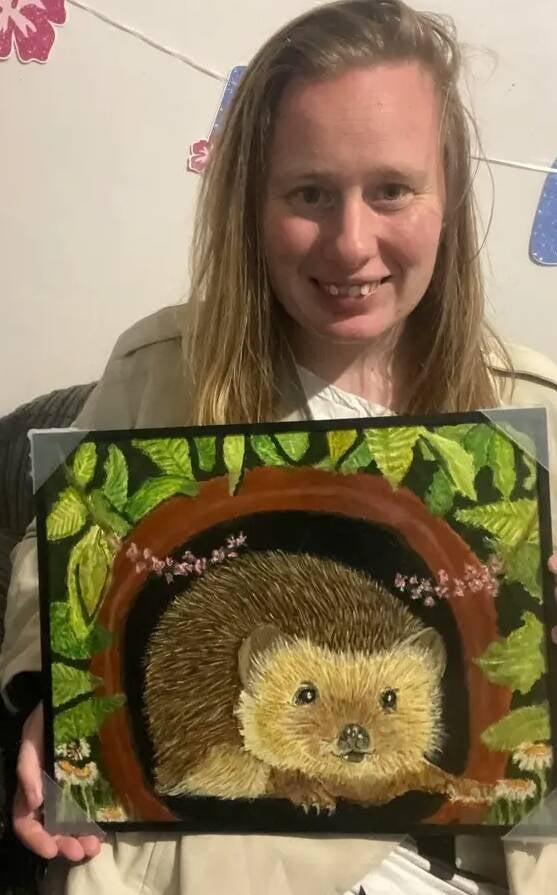
Varnished and Framed Original Design "Garden Days With Herbert"
One of the wonderful new services I am now offering is framing, and while this is great for clients who want a complete, ready-to-display piece that they can hang straight away, it adds another layer of planning, time, and care to the whole process. I do not keep frames stored or held in stock, because every piece is unique, and I want to be able to offer you exactly the style, colour, and size that suits your artwork and your home perfectly. That means every frame is custom ordered specifically for each piece and each client’s preferences.
Once we have chosen the right frame together and you have confirmed you’d like this added, I have to measure everything precisely and carefully, place the special order, and then wait for the frame to arrive. Even once the frame is here and ready, I cannot start the framing process until I am 100% certain that the varnish is fully cured, hardened, and safe to handle. If I frame it too soon, I could leave fingerprints or marks in the finish, scratch the soft surface, or trap moisture inside the frame which would cause damage, mould, or discolouration later on. Framing itself is a careful, skilled job too — I make sure the painting sits perfectly straight, is secured safely and professionally, and is protected properly inside the frame, so it stays flat, safe, and in pristine condition for you.
So, once it is framed and looking beautiful — are we done? Not even close. There are still important, meaningful details to take care of before it is ready to leave my workspace. Every single piece I create — whether it is a custom commission or an original artwork for exhibition — comes with a certificate of authenticity. This is a special, official document I prepare personally for every client. It confirms that the artwork is an original, created entirely by me, and includes details about the piece, the date it was finished, its unique title, and its characteristics. I design, print, and check each certificate carefully, making sure everything is correct, clear, and presented beautifully, because it is part of the value, the story, and the experience of owning one of my artworks.
If the piece is an original design — especially those created for exhibition or inspired by a specific animal, breed, or story — you will also receive a written statement from me. This explains exactly what inspired the piece, why I chose to paint that animal or subject, and shares interesting facts and details I have researched about the breed, their behaviour, their history, or the story behind the artwork. It adds extra depth, meaning, and understanding to the painting, so you don’t just have a beautiful image, but you have the background, the research, and the reasoning that went into creating it. I spend time writing and researching this too, ensuring that everything I share is accurate, interesting, and meaningful to you.
Then comes the stage that is all about making sure your precious artwork arrives safely: packing. This is something I take incredibly seriously, because I know how much each piece means to you — whether it is a portrait of a beloved family pet, or a special piece you have chosen for your home. I want it to reach you in exactly the same perfect condition it left my hands. Packing is not just putting it in a box — it is a process of protecting it from every possible risk during transit: bumps, knocks, drops, pressure, moisture, dust, and changes in temperature.
I use only high-quality protective materials: acid-free tissue paper to gently wrap the surface first and prevent any marks or scratches, layers of thick bubble wrap or foam padding all around for cushioning, strong, rigid cardboard boxes or custom-made wooden crates for larger or framed pieces, and plenty of filler material to make sure it cannot move, bend, or shift around while it is on its way to you. I think about every detail: sealing it properly, adding waterproof protection where needed, and making sure the package is clearly labelled, fragile-marked, and secure. It takes time and care to pack every piece properly, but it gives me total peace of mind, and ensures that when you open the package, it is exactly as I intended it to be.
Add comment
Comments